Note: Use 1/2" or 3/4" black water hose which is flexible and much easier to work with. But the videos are funny & informative!
SOLAR HOT WATER SHOWER DIY BLACK WATER HOSE PART 1
Uploaded by GREENPOWERSCIENCE on Mar 31, 2008
Part 1 of a 2 part series showing how to install a cheap cost effective solar hot water heater. http://greenpowerscience.com/
Category: Science & Technology
http://youtu.be/UXGlB1kGO5E
SOLAR HOT WATER 2 DIY USING BLACK WATER HOSE SOLAR WATER HEATER SUN POWER
Uploaded by GREENPOWERSCIENCE on Mar 31, 2008
Part 2 of a 2 part series showing how to install a cheap cost effective solar hot water heater. http://greenpowerscience.com/
http://www.youtube.com/watch?v=sBAi_TVNaiM&feature=fvwp&NR=1
http://youtu.be/sBAi_TVNaiM
Wednesday, September 28, 2011
Thursday, September 22, 2011
Build a simple solar water heater

Reposted from I Will Try.org - great name!
http://www.iwilltry.org/b/projects/build-a-simple-solar-water-heater/
Introduction
I’ve seen a few different designs for solar water heaters and I wanted to share my own. It is quite an efficient design since every square inch of collector surface is in direct thermal contact with the water being heated. You can easily modify the design to any size you like. I made mine 8ft long by 22″ wide so that it can fit between the rafters in my attic. Tests showed that system output averaged about 530 Watts, heating 20 litres of water from 24 degrees C (75 degrees F) to 47 degrees C (117 degrees F) in one hour.Aside: I’m in the middle of re-roofing my house and plan to build in a transparent section of roof in one area. Then I can experiment with different solar collector designs like this one and install and remove them easily from inside my attic instead of having to go out on my roof. It will make the plumbing easier too. The drawback is that if a collector springs a leak, it will leak into my home instead of into my gutter. See Build a solar attic for details.
Warning – Don’t drink the water
It is not my intent for this design to be used for heating drinking water. The plastics and glues used will leach into the water so it’s a bad idea to drink any water that has been inside the panel. If you want to use this design for heating drinking water you should make a heat exchanger. Run the water from the collector through a coil of copper pipe placed in a tank suitable for drinking water. This collector design is also not meant to withstand city water pressure, but if you use a heat exchanger and an appropriate tank (such as a commercial hot water tank) you can use a collector like this to heat drinking water at city water pressure.Concept
The collector is made from Coroplast (see http://www.coroplast.com) which is a corrugated plastic sheet, commonly used for making signs. It has multiple square channels running lengthwise from end to end. When I first saw this type of sheet I immediately thought, “Wow, this would make an excellent flat panel solar collector if only there was a way to pipe water through all those little channels.” Several weeks later, a method of doing so occurred to me. If a slot of the right width is cut lengthwise in some ABS pipe (so the cross section looks like a “C”) then this pipe can be fit over the end of the corrugated plastic.The seams can be sealed to make everything water tight. The sheet can be painted black and voila… you have a flat panel solar collector.Because the whole collector is made of plastic, it is important that the temperature doesn’t get too high or it will soften and possibly spring a leak. 80 degrees C (176 degrees F) is about the limit. Don’t think it can get that hot? Think again. In practice the maximum temperature is difficult to guarantee.
Water may stop circulating, or may drain out completely for a number of reasons and the panel will overheat. Therefore this may not be a practical design for residential installation but it is an inexpensive, easily built experimental system that produces as much or more hot water than commercially available systems. Mine cost about $60 in materials (about $4.00 per square foot) and about 6 hours of construction time.
...more (with excellent photos and instructions:
http://www.iwilltry.org/b/projects/build-a-simple-solar-water-heater/
Re: Solar Pool Heater
robert brooks to me
Sept. 22, 2011
Robert, I'm here in Guatemala and looking at how to best heat the small swimming pool at my friend Georgina's small hotel. We are on a very tight budget so I need to use inexpensive or recycled materials. Can we heat the pool with "all pipe" without a pump?
I've seen a coil of black 1/2 inch pipe on a roof that makes a hot shower. We can put pipe on the flat roof of the hotel restaurant and pipe it down to the pool, or put those plastic liter bottles since that apparently doesn't need a pump.
I know nothing about plumbing or electronics, so any help is appreciated. I have your list below. You said "just use pipe," and another architect friend who is emailing me said the same thing. ???
We are measuring the pool and thanks for the vol. sq. in. formula below. I didn't know it. I'm uploading photos of the hotel on flickr. Very slow going (slow internet connection here) but they should all be uploaded by tomorrow. Some are there already.
Solar Installation for Hotel Playa Linda: http://www.flickr.com/photos/catherinetodd/sets/72157627598274307/
Thank you for your inspiration and help! Catherine Todd (contact and links below)
---
Dear Catherine,
All that need done is; the outlet of the pool filter gets diverted to a line of black pipe ( or green hose or any sort of hose)
The end of that line gets redirected into the bottom of the pool. Naturally, the more lengthy the journey through the pipes becomes the warmer the water becomes.
If the pool doesn't use a pump for it's filtering; any sort of pump that handles water will do. Additionally, solar covers work to retain the heat in the pool.
There are many good videos on you tube describing the process. I hope this helps.
Robert Brooks
Wednesday, September 21, 2011
Horoscope Aquarius for week of September 21, 2011
Rob Brezsny's Astrology Newsletter
September 21, 2011
AQUARIUS (Jan. 20-Feb. 18): I gathered together a panel of renegade astrologers to investigate your imminent future. By a unanimous vote, they designated you, out of all the signs of the zodiac, as the one "Most Likely to Exceed the Boring Limitations of Good Taste," as well as "Best Candidate to Slap the Conventional Wisdom Upside the Head." That sounds fun. I hope you make good use of the freedom that those roles entail. By the way, the general consensus also suggested that you are primed to find valuable stuff in out-of-the-way borderlands or in off-limits haunts where no one else even wants to look.
FreeWillAstrology.com
Tuesday, September 20, 2011
A Liter of Light Information - updated instructions with pictures

A Liter of Light - Director's Cut: http://youtu.be/TYEIT6lLb8A
A Liter of Light Information
Tue, Sep 20, 2011 at 8:15 PM
To: Catherine Todd
Hello Ms.Catherine!
I'm glad to tell you that the technology is currently being developed to store the energy the bottle gets in the morning and use it at night. We will keep in touch. We're doing our best to move fast, combine, and align everything so we can provide a more comprehensive information bank for everyone. Thank you for helping us make the world a better, sustainable, place!
Kristel Gonzales
Documentation and Internal Affairs
A Liter of Light Team
From: Catherine Todd
Tue, Sep 20, 2011 at 11:08 PM
To: A Liter of Light Information
Kristel Gonzales
Documentation and Internal Affairs
A Liter of Light Team
www.aliteroflight.org
A Liter of Light ► http://t.co/GpEbARF
To donate or volunteer visit ► www.isanglitrongliwanag.org
A Liter of Light - Director's Cut: http://youtu.be/TYEIT6lLb8A
Video with English Instructions: http://www.youtube.com/watch?v=QMrzUztT4UE
Dear Kristel,
You wrote: "I'm glad to tell you that the technology is currently being developed to store the energy the bottle gets in the morning and use it at night."
Can't wait to see what you come up with! The whole world is seeing your videos and how you are implementing the Solar Bottle Bulb. Please keep me on your information list. We are working in Guatemala right now with the solar bottle bulb idea and I can't wait to try it. It's people like you that are making the world a better place. I have listed your new videos, including "director's cut" above. I also see you have a way to donate on your main webpage. I hope you put a PayPal button on your Facebook page.
I have received many excellent ideas from people starting with your solar bottle bulb technique, and I am hope they send you their ideas. We will certainly send you whatever techniques my architect and engineer come up with any improvements we are able to make. We are also concerned with safety and not damaging property with this installation. We are going to set up some test models with different roofing materials and different caulks, high pressure water hoses, and film the results. I will send you the results. We will also translate the final instructions into Spanish and English with diagrams for those people who do not have computer access to see the videos. I will send them to you when they are finished.
It's a wonderful thing you and everyone who worked on this idea is doing. This will change the world for the better. Once the energy can be stored for use at night, everyone will be able to have light and not pay an electricity bill. Many people here in Guatemala cannot afford electricity or live very far away off-grid so this will change everything for them. Can't wait to see what you come up with!
Where is your PayPal donation button? I and many others want to donate!
Catherine Todd
Guatemala and USA
cell Guatemala (502) 4198.2214 new
Monday, September 19, 2011


Friday, September 16, 2011
Solar Heating and Lighting For Your Garage Shop/Playroom/Sunspace

Reposted by Build It Solar.com, The Renewable Energy Site for Do-It-Your-Selfers
http://www.builditsolar.com/Projects/SpaceHeating/SolarGarageCollector/garcol.htm
http://www.builditsolar.com
An article describing this inexpensive and very efficient solar heater for a shop, studio, or playroom. This project provides an great combination of solar heating and daylighting -- it makes for a space that is a delight to be in. My all-time favorite solar project.
The article explains why this $4 per sqft collector can do as well as well or better than commercial collectors costing $30 per sqft, and provides full construction details. It also describes a new version that can be built with only basic tools.
Go to website to download these articles:
http://www.builditsolar.com/Projects/SpaceHeating/SolarGarageCollector/garcol.htm
Download the Home Power article (pdf)
Thanks to Home Power for making this available!
Visit the Home Power website
Additional downloads for this project
Additional Details (pdf)
(not as well written or illustrated as the HP article, but has a couple ideas not covered in the HP article)
How does it do at -20F?
(describes how the heater does in very cold but clear weather)
---

Workshop or Studio Sunspace
This is an inexpensive and simple project to convert a garage that has a south facing overhead garage door into a solar heated and lighted workshop, studio, playroom or sunspace/greenhouse.
It’s hard to overstate how much more pleasant this makes the shop to work in -- on sunny days its toasty warm and very well lighted. I think it would also work well as a studio, kid’s playroom, a place to grow a few plants, or maybe just a place to sit and read the newspaper.
I really like the way the existing garage door is used as movable insulation to reduce night heat loss. The combination of the new outer glazed doors, the existing overhead garage door, and the simple shade cloth sliding screen make a simple but very effective way to control the shop environment, harvest some free solar heat, and reduce green house gas emissions.
These simple collector doors at $4 per square foot do as good a job of solar heating as commercial solar collectors costing $30 per square foot – and, they give you the added bonus of good lighting and a view!
Of all the solar projects I've completed, this one has been the most satisfying in its simplicity and usefulness.
---
http://www.builditsolar.com/Projects/SpaceHeating/SolarGarageCollector/Sliders.htm

An Alternative to Building Your Own Doors
Instead of making the glazed doors yourself, this suggestion makes use of a commercial door system for the outside glazed doors. These door systems are used in Florida and like climates to allow a room or sunspace to have a glazed wall, or to stow the glazing panels off to the side to fully open the area to the outside. The idea is to use one of these door systems instead building your own outside doors. This looks like it would work fine to me, and looks like it would result in a very attractive and functional system. Several types of sliding and folding door arrangements are made (more....
http://www.builditsolar.com/Projects/SpaceHeating/SolarGarageCollector/Sliders.htm
This suggestion came from Ed via Home Power -- thanks!
Here are some excerpts from Ed's email, and some pictures he provided:
http://www.builditsolar.com/Projects/SpaceHeating/SolarGarageCollector/Sliders.htm
A CAD rendering of one of the possible door arrangements.
http://www.builditsolar.com/Projects/SpaceHeating/SolarGarageCollector/Sliders.htm
More: http://www.nanawallsystems.com
Thursday, September 15, 2011
Building a Passive House & LED Lights

http://minuszeroeco.blogspot.com/
Building a house
An architectural
ecological
escapade
Building a Passive House
Plastic soda bottles become light source
Another detailed video making Solar Bottle Bulbs:
http://youtu.be/kHTD_RX3J2I
YouTube comment: "I've seen other versions of this, but this one explains the refractive effect and why that makes a difference." - TheAuntieBa
"Isang Litrong Liwanag" campaign headed by philanthropist Illiac Diaz turns plastic soda bottles into nifty light bulbs in small homes, which absorbs sunlight and spreads it out inside a house.
This video was produced exclusively for Yahoo! Southeast Asia by loQal.ph
The water and sunlight uses LIGHT REFRACTION to produce more light than a simple hole in the roof would.
---
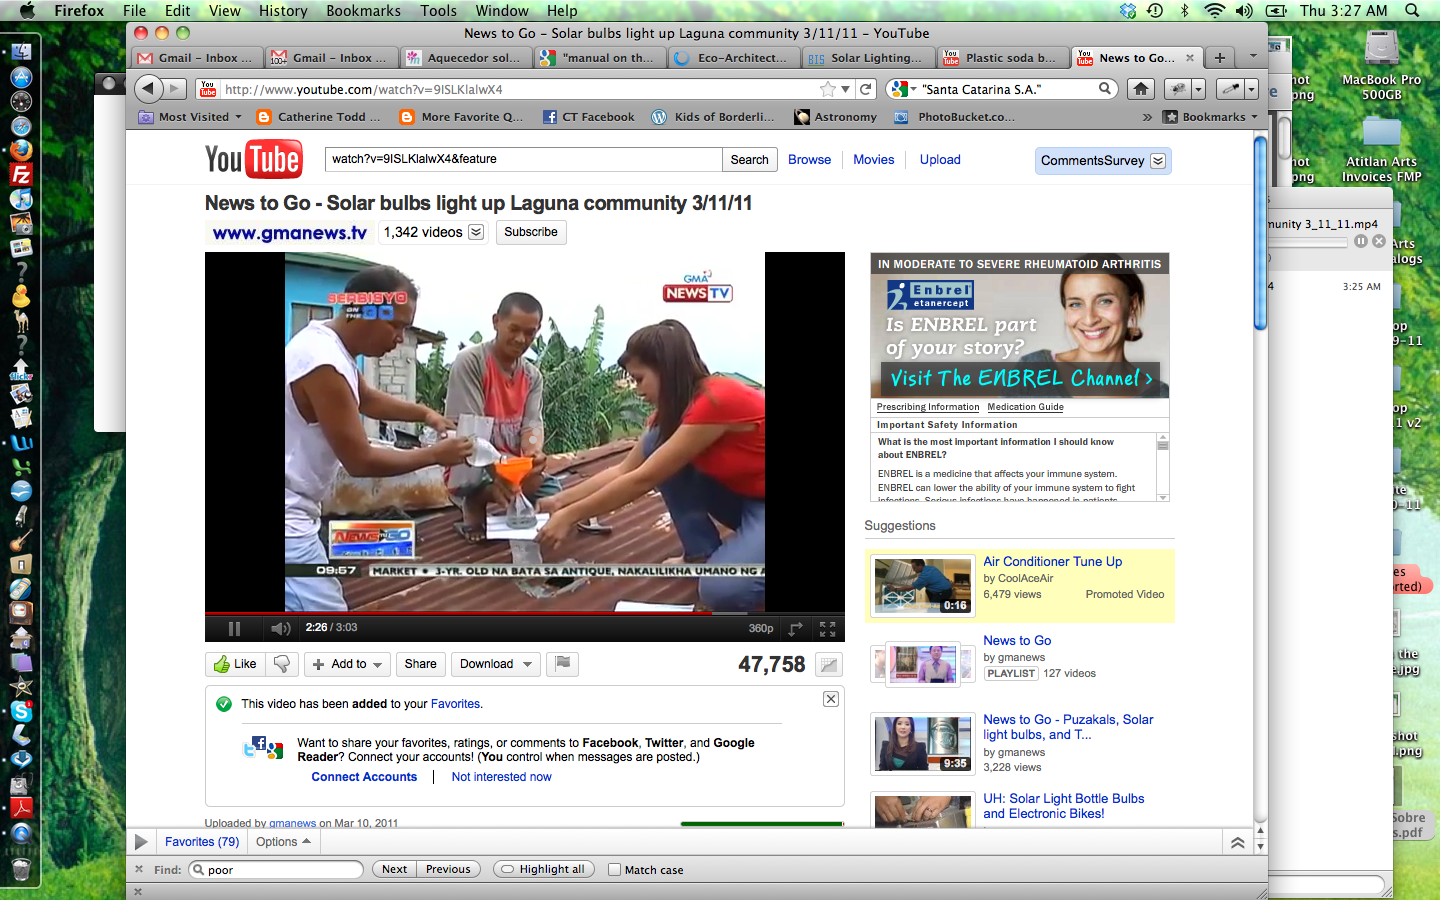
And yet another video on Solar Bottle Bulbs. This one explaining refraction (in Philipino?): News to Go - Solar bulbs light up Laguna community 3/11/11
http://www.youtube.com/watch?v=9ISLKlalwX4
"In "Serbisyo on the Go," Kara David visits a community in Laguna where residents are having a hard time paying their electricity bills. To keep power costs down, social entrepreneur Illac Diaz and the Rotary club taught residents how to make "solar light bulbs" using plastic soda bottles, water, and bleach."

------
Found from an excellent list on BuildItSolar.com: http://www.builditsolar.com/Projects/Lighting/lighting.htm#BottleLight
http://youtu.be/kHTD_RX3J2I
YouTube comment: "I've seen other versions of this, but this one explains the refractive effect and why that makes a difference." - TheAuntieBa
"Isang Litrong Liwanag" campaign headed by philanthropist Illiac Diaz turns plastic soda bottles into nifty light bulbs in small homes, which absorbs sunlight and spreads it out inside a house.
This video was produced exclusively for Yahoo! Southeast Asia by loQal.ph
The water and sunlight uses LIGHT REFRACTION to produce more light than a simple hole in the roof would.
---
And yet another video on Solar Bottle Bulbs. This one explaining refraction (in Philipino?): News to Go - Solar bulbs light up Laguna community 3/11/11
http://www.youtube.com/watch?v=9ISLKlalwX4
"In "Serbisyo on the Go," Kara David visits a community in Laguna where residents are having a hard time paying their electricity bills. To keep power costs down, social entrepreneur Illac Diaz and the Rotary club taught residents how to make "solar light bulbs" using plastic soda bottles, water, and bleach."
------
Found from an excellent list on BuildItSolar.com: http://www.builditsolar.com/Projects/Lighting/lighting.htm#BottleLight
Manual on the Construction and Installation of Solar Water Heater Composed of disposable packaging

In Portuguese (Brazil?):
Solar Hot Water System by José Alcino Alano, story at: http://vilamulher.terra.com.br/aquecedor-solar-caseiro-13-1-49-41.html
Excerpt: "O melhor da ideia do casal é que qualquer um pode construir seu próprio aquecedor. Basta seguir as instruções do “Manual Sobre a Construção e Instalação do Aquecedor Solar Composto de Embalagens Descartáveis”, disponível na Internet com um passo-a-passo para a produção e instalação."
"The best of the couple's idea is that anyone can build your own heater. Just follow the instructions "Manual on the Construction and Installation of Solar Water Heater Composed of disposable packaging," available on the Internet with a step-by-step for the production and installation. " ...more
Manual on the Construction and Installation of Solar Water Heater Composed of disposable packaging - BuildItSolar / Manual Sobre a Construção e Instalação do Aquecedor Solar Composto de Embalagens Descartáveis
Une Autro: http://vilamulher.terra.com.br/aquecedor-solar-caseiro-13-1-49-41.html
Mas Information in Spanish: http://www.sociedadedosol.org.br/
Aquecedor Solar Composto de Embalagens Descartáveis - UOL
josealcinoalano.vilabol.uol.com.br/manual.htm
Manual detalhado e ilustrado para se construir um aquecedor de água solar, usando garrafas pet e embalagens descartáveis tetra pack.
Página em Manutenção
CLIQUE AQUI para baixar a versão completa em PDF (adxunto)
http://josealcinoalano.vilabol.uol.com.br/manual.htm
2 attachments — Download all attachments
Screen shot 2011-09-15 at 2.35.20 AM.png Screen shot 2011-09-15 at 2.35.20 AM.png
Manual Sobre a Construção e Instalação do Aquecedor Solar Composto de Embalagens Descartáveis.pdf
---
Rough google translation in English, download pdf:
Construction and Installation of Water Heater Made of - BuildItSolar
www.builditsolar.com/.../...
File Format: PDF/Adobe Acrobat
Feb 21, 2009 – Manual on the Construction and Installation. Solar Heater Made of disposable packaging. (Turn Trash Hot Water). Prepared by: José Alcino ...
http://www.sociedadedosol.org.br/
http://www.builditsolar.com/
---
Found via this person on Facebook: THANK YOU!
Takeshi Nozawa, https://www.facebook.com/profile.php?id=732655668
Takeshi wrote: "Hola Catherine. I found an article of him. FYI... http://www.facebook.com/l/0AQCTObDc/vilamulher.terra.com.br/aquecedor-solar-caseiro-13-1-49-41.html
http://vilamulher.terra.com.br/aquecedor-solar-caseiro-13-1-49-41.html
http://vilamulher.terra.com.br/aquecedor-solar-caseiro-13-1-49-41.html
Aquecedor solar caseiro - Vila Compras
vilamulher.terra.com.br
A palavra de ordem é sustentabilidade No entanto preservar não é suficiente É preciso substituir e melhorar hábitos e atitudes E tudo pode começar dentro de casa Artesanalmente e a partir de material reciclado por exemplo é possível construir um aque
http://josealcinoalano.vilabol.uol.com.br/manual.htm
http://www.builditsolar.com/:

Lots of solar bottle bulbs and other interesting solar ideas:
http://www.builditsolar.com/Projects/Lighting/lighting.htm#BottleLight
Wednesday, September 14, 2011
4 videos for Solar Bottle Bulb & Solar Hot Water Heater
Luz solar y calentador solar de agua caliente / Solar Light & Solar Hot Water Heater
2 messages
Catherine Todd Wed, Sep 14, 2011 at 3:10 PM
To: Eddy Amilcar
See these videos for a solar light and solar hot water heater I want to talk about. I have some money to do this. I would like to try at the Hotel Playa Linda. CT
= Ver estos videos de una luz solar y calentador solar de agua caliente que quiero hablar. Tengo algo de dinero para hacer esto. Me gustaría probar en el Hotel Playa Linda. CT
Brasil: Utilice una botella de 2 litros como un corte de luz de 50 vatios bombilla Bombilla:
http://youtu.be/_zMAWztZ6TI
Bombilla Botella Solar: La luz de la vida .. mp4: http://youtu.be/9FiplFylMOc
Bombilla Botella Solar - Cómo construir (Tagalog): http://youtu.be/laANmQlrJHo
Calentador solar de agua caliente: http://youtu.be/ehDgXrpRlTU
Traducción::
Brazil: Use a 2-Liter Bottle as a 50 Watt Light Bulb lightbulb hack: http://youtu.be/9FiplFylMOc
Solar Bottle Bulb: The light of life..mp4: http://youtu.be/9FiplFylMOc
Solar Bottle Bulb - How to Build ( Tagalog): http://youtu.be/laANmQlrJHo
Solar Hot Water Heater: http://youtu.be/ehDgXrpRlTU
2 messages
Catherine Todd
To: Eddy Amilcar
See these videos for a solar light and solar hot water heater I want to talk about. I have some money to do this. I would like to try at the Hotel Playa Linda. CT
= Ver estos videos de una luz solar y calentador solar de agua caliente que quiero hablar. Tengo algo de dinero para hacer esto. Me gustaría probar en el Hotel Playa Linda. CT
Brasil: Utilice una botella de 2 litros como un corte de luz de 50 vatios bombilla Bombilla:
http://youtu.be/_zMAWztZ6TI
Bombilla Botella Solar: La luz de la vida .. mp4: http://youtu.be/9FiplFylMOc
Bombilla Botella Solar - Cómo construir (Tagalog): http://youtu.be/laANmQlrJHo
Calentador solar de agua caliente: http://youtu.be/ehDgXrpRlTU
Traducción::
Brazil: Use a 2-Liter Bottle as a 50 Watt Light Bulb lightbulb hack: http://youtu.be/9FiplFylMOc
Solar Bottle Bulb: The light of life..mp4: http://youtu.be/9FiplFylMOc
Solar Bottle Bulb - How to Build ( Tagalog): http://youtu.be/laANmQlrJHo
Solar Hot Water Heater: http://youtu.be/ehDgXrpRlTU
Tuesday, September 13, 2011
How to Make a PVC Solar Hot Water Heater

How to Make a PVC Solar Hot Water Heater
Read more: How to Make a PVC Solar Hot Water Heater | eHow.com http://www.ehow.com/how_5261329_make-solar-hot-water-heater.html#ixzz1XoiQqlHn
Building a PVC pipe solar hot water heater can reduce or eliminate the need to use "grid" power to heat water for the home. By using PVC pipe encased in a heat-building box, then installing this box in a location that receives ample sunlight, the water is heated and pumped into the home using thermal energy. Installing several of these heat boxes will provide an abundance of hot water, and can be built and installed by an average backyard engineer in about three hours.
Read more: http://www.ehow.com/how_5261329_make-solar-hot-water-heater.html
Monday, September 12, 2011
Building Science.com

From Architect Mark Comerford markjcomerford@yahoo.com:
By the way, if you are interested in building technology issues, one of the best sites I know of, sponsored by one of the worlds leading building scientists, Lsturbek, is www.buildingscience.com
More Answers to How to Create a Solar Bottle Bulb that doesn't leak!
Finally contact info from A Liter of Light (Isang Litrong Liwanag) on Facebook. They wrote: "kindly request for the instructional guide at info@aliteroflight.org so the team can send you details. thanks!"
The light of life..mp4
http://www.youtube.com/watch?v=9FiplFylMOc
http://youtu.be/9FiplFylMOc
More ideas from Mark J. Comerford, architect:
from mark comerford markjcomerford@yahoo.com
to [Available] Catherine Todd
date Mon, Sep 12, 2011 at 2:13 PM
subject Re: bottle lights caulk
mailed-by yahoo.com
signed-by yahoo.com
Important mainly because of your interaction with messages in the conversation.
hide details 2:13 PM (11 hours ago)
Catherine,
Here's what I have thus far, and I hope to have an update for you later.
Your project and blog discourse have got me thinking about issues with the original youtube design that an improved version should try to avoid.
Creating a Leaky Roof?
One of your readers comments ("be careful about poking holes in someones roofs) got me thinking how the water integrity (no leaks) especially in the rainy season--where I suspect it may be too rainy for days on end to repair, is important, and how you might be doing them a service in terms of creating interior light but a disservice in terms of a leaky roof.
Then, thinking about the Youtube approach, chiseling the hole in the rusty corrugated roof, ( I understand how this is done working on a shet metal on the ground, where you could back it up with something firm, but how this is done in installed panels escapes me) gooping unprepared substrate with sealant and expecting it to adhere to both a rusty roof and a slick plastic bottle. I think the method they are proposing is just too crude to expect to get a "permanent" solution. While the silicone will last 30 years the entire system will fall apart rather quickly due to thermal contraction /expansion, roof movement due to wind and possibly foot traffic, and most importantly inability to prepare substrate properly resulting in adhesion gaps leading to water entrance, etc.
Skylights in modern house construction are tricky to flash/seal properly and are often avoided by builders and owners due to fears that they will inevitably leak, and this is all in the context of a much more precision oriented and better trained workforce.
Is Disposable Skylight OK?
What you will be giving them, at this level of technology, is a disposable skylight. This may not be bad as the time and effort to make a new one every year is not so great and it is consistent with the technology and unemployment of the vernacular/economy which is in itself largely recycled/disposable. If this is the approach you take then be sure to make it clear to everyone it is disposable. And it may well be the best approach
Thinking about it, in the context of the disposable option, The urethane makes better sense than silicone. While it wont last as long as silicone, it will definitely outlast the assembly. Urethene requires less skill and procedural diligence to apply effectively than silicone, and costs less than half. It is a bit softer and more forgiving and probably adheres better in the short term than silicone. I'd bring a few tubes of each and then experiment.
More Permanent But More Difficult Option:
I think a more permanent solution ( i e 10 year) would be much better, and allay the fear that in the process of providing light you are creating a hole in their roof for rain. That solution would address the deficiencies that make the Youtube model so temporary. I think it is "doable" but will add a few steps and complexity to the skylight design and construction process. And you will need to build several experimental mock-ups to fine-tune process. In terms of our Appalachia analogy, instead of doing 100 skylights you will do 20. But they should have less leak/maintenance problems. Here are some issues/suggestions whose solution could yield a more permanent skylight:
Glass or Plastic Bottle?
Replace plastic 2 litre bottle with glass bottle. The glass will provide an ideal substrate for the silicone, as opposed to the plastic, which has to be sanded/scratched, and also probably suffers from UV degradation when it bakes in the sun, and may have chemical compatibility issues. Find bottles with broad caps (like the Nagene hiking bottles for example or canning jars)and position the bottles so that the caps are on top. Thus if the water clouds the bottles the water can be replaced from the top without tearing the skylight apart.
If Glass, Support More Critical
Design a wire basket or strap assembly to support the skylight bottle from the underside. This will have to be thought out--not sure whether rivets into potentially rusty room metal is good enough, but a simple, cheap design should be easily figured out. This could be a safety issue. Do they have earthquakes?
Consider Flashing
This is the hardest, but potentially most beneficial step if done properly: Flashing. Flashing is sheet material used to redirect water. You have in your blog a link to a thru-roof penetration sleeve; what that is doing gets to the heart of flashing. What the flange at the base of that sleeve functionally does is elevate the opening of the roof above the plane of the water. But for it to work the lower portion of the flange must be sealed/integrated into the design of the roof. So really you need to know exactly what type of roof you are penetrating prior to designing the flashing
You might search the web for the SMACNA manual on sheet metal flashing. It consists of hundreds of different diagrams for sheet metal flashing addressing hundreds of different situations. For flashing to work, it is highly customized to the specific site/roofing conditions. Failure of flashing is the most common source of building links.
By the way, if you are interested in building technology issues, one of the best sites I know of, sponsored by one of the worlds leading building scientists, Lsturbek, is www.buildingscience.com
Flashing for Corrugated Roofs
The problem I see with using a sleeve of the type you have shown is that it is not made for corrugated roofs. I cannot envision how this would work with a corrugated roof. Unless you position the leading (upper) edge of that flange beneath one of the bottom edges of the corrugated roofing sheets, you will have created a condition where the gaps between the flat flange and the undulating roof panels will have to be dammed up with globs sealant. You might use a tube or more of sealant on one skylight--expensive stuff.
I'll try to look into flashing solutions for corrugated roofs. Do you only have corrugated roofs?
This is where the water penetration would likely occur, as the water works its way on the interface between the sealant and the rusty corrugated roof panel at that dam. All this is aggravated by thermal expansion/contraction, roof panel flexing in high winds, etc. The primitiveness of their technology makes it all the more challenging. The youtube video approach doesn't really seem to use flashing as I understand it, it must rely on the sealant to act as a dam against the water. I need to look at the video again
Build a wooden curb/box Idea
( or maybe modify already made plastic tupperware type box)
What would work better, I think, would be to build a small wooden box that is fashioned to mate with the undulating profile of the corrugated roof, sit on top of the roof, and then the bottle penetrates the top (base) of the box.
Wooden box customized to roofing material
Imagine taking a wooden box, say 12" x 12" x 4" high, then cutting it, probably with a jig saw, at two opposite edges in an undulating pattern that matches the profile of the roofing. You would have to determine the undulating pattern, using a simple carpenters scribing technique, and it may vary house to house.Then, turn the box upside down, and sit it on top of the roof, centered above a previously cut bottle hole, and seal all around with silicone.
Silicone Profile
Note that this sealant profile (the cross section through the sealant attaching the box to the roof panels) is now of a consistent dimension rather than having gobs of sealant here and little sealant there. The undulation is handled by the box geometry. Having the sealants profile of a consistent dimension (ideally for movement conditions in an hourglass shape in section, a 3/4" wide joint should be 3/8" deep at narrowist, and this geometry allows the sealant to be elastic, and act more like a rubber band.) Note with a rubber band that it is very elastic pulling in one direction, but less so in the other. This is because the cross sectional shape of the material (rubber band, or sealant) effects its elasticity. )
Now you essentially have an upside down wooden box glued to the top of the roof, and because of the undulating cut of the opposing edges of the box, the box matches geometrically with the roofing and the sealant width can be uniform. Now cut a hole in the top of the box and insert bottle through. Note that this is now an easily sealed joint. You are not gooping sealent around an undulating material. Plus, this joint is located above the plane of the water cascading down the roof and thus less vulnerable to the ravages of time and water volume
Then there might be two options. You might ignore the bottle and just slap a sheet of glass on top with silicone used as an adhesive. This would actually be more foolproof/simpler, a less tricky joint, as the glass protects the joint, and the joint is not weather exposed
But I suspect that the suspended bottle full of water might have an optical effect better than simply a hole in the roof, and probably look and behave more like a light bulb. Not sure. But you might experiment with ignoring the bottle altogether. Maybe even just make the base of the box out of plexiglass or clear plastic and call it a day.
Logistics: Benefit of an offsite shop
Now the more permanent method I am proposing involves more precision, translating into more equipment, training, and time. I might consider setting up a shop in town to build the boxes. Here you have electricity, controlled environment, level tables and lighting, proper tools, and security (locked door) to keep the tools from being swiped. I suspect a sawzall is equivalent to a years salary, so tool security will be an issue.
Then you go to the field, meet the occupants, determine the profile of their specific roof panels ( I bet there is a variety of roof sheeting used, varying from place to place), and make some field measurement/ sketch. Do this for each 20 different houses. Then return to the shop with the electricity and make the 20 different boxes in the shop. (or modify the found tupperware type boxes) Here you could also paint them. Return to the field to install.
Shop not required though--all required tools are available rechargable. But you will need to be recharging batteries often, probably daily. May
Summary
More permament solution will require elevated skills and organization. Electric tools will cut through metal like butter compared to hand but will present theft problems. More information is necessary about the roof systems you will be encountering, and permanent solutions will vary depending on type of roof systems encountered.
Do you have a sense of which direction you want to go? In either case I would try to set up a cottage industry where they are installing these themselves like the chap in the video. The process of teachng them some basic carpentry skills and in a sense elevating the technology a bit might have its own benefits as well. Maybe as a part of this you establish a little carpentry school where students are building these roof boxes/skylights. The community gets better skylights and also a cadre of people who now understand some basics about field measurement, drawing, working with wood, basic power tool operation, etc. This might benefit some to "move up" to become carpenters for whatever richer class or group is nearby.
Shopping List
The questions raised above (permanent vs temporary, on site construction versus remote/ shop construction, and hand versus elect tools, all affect your shopping list. If you can provide me input on the level of permanence you think is appropriate, and the amount of modern technology (electric drills, etc) that would be best, I can provide you with a better shopping list. Ideally, we would figure the design parameters out better before shopping, but I understand your dilemma about your flight Thursday. To figure out the design, we really need to know specifically about what type of roof panels they have--which again may vary considerably.
Let me know your reactions and I will make a recommended list. I'll also go through the videos you've attached which I haven't yet dug into to see whether the design concerns I have are addressed already.
It boils down to doing the Youtube video way, which is inherently simple but also is probably not going to work long term, and is definitely going to create maintenance headaches on a yearly (at best) cycle, or elevating the technology, to get a more permanent solution, which will also make the whole process more complex and in a more difficult. Which way to go?
All the best,
Mark
Bolivia Set to Pass Historic 'Law of Mother Earth' Which Will Grant Nature Equal Rights to Humans

(photo: Wikimedia Commons)
Monday, 18 April 2011 09:43, PV Pulse.com
Bolivia Set to Pass Historic 'Law of Mother Earth' Which Will Grant Nature Equal Rights to Humans
Written by Keph Senett
With the cooperation of politicians and grassroots organizations, Bolivia is set to pass the Law of Mother Earth which will grant nature the same rights and protections as humans. The piece of legislation, called la Ley de Derechos de la Madre Tierra, is intended to encourage a radical shift in conservation attitudes and actions, to enforce new control measures on industry, and to reduce environmental destruction.
The law redefines natural resources as blessings and confers the same rights to nature as to human beings, including: the right to life and to exist; the right to continue vital cycles and processes free from human alteration; the right to pure water and clean air; the right to balance; the right not to be polluted; and the right to not have cellular structure modified or genetically altered. Perhaps the most controversial point is the right "to not be affected by mega-infrastructure and development projects that affect the balance of ecosystems and the local inhabitant communities".

...more
Solar Water Heater from Brazil "Soda bottle solar water heater" -Panasonic ecoideasnet
This is the solar hot water heater I want to build when I get back to Guatemala. Hotel Playa Linda first.
http://youtu.be/ehDgXrpRlTU
From YouTube: For more eco ideas follow us on: http://www.facebook.com/ecoideasnet
This self-built solar water heater is made of plastic bottles, black painted milk cartons and PVC pipes. It is popular in southern Brazil.
The water is heated passively by solar energy. As the hot water rises, it is naturally replaced by cold water, so no pump is needed.
Construction reference:
http://www.youtube.com/watch?v=c-Y5AwFuTGU
Brazil Factory Recycles Empty Toothpaste Tubes into Useful Products
http://youtu.be/AGLJ3Xoo_L8
Brazil Factory Recycles Empty Toothpaste Tubes into Useful Products
For more news and videos visit ☛ http://english.ntdtv.com
Follow us on Twitter ☛ http://twitter.com/NTDTelevision
Add us on Facebook ☛ http://facebook.com/NTDTelevision
A small factory in Brazil's northeast is squeezing new life out of spent toothpaste tubes by turning them into furniture and roof tiles. One of the beneficiaries is a local school where the children are learning that regular brushing is not only good for the teeth, but can also help the environment.
Children attending the Instituto Negromonte elementary school in Olinda, Northeastern Brazil, are sitting on what were once toothpaste tubes.
Workers in a small factory on the outskirts of town are turning otherwise useless packaging into chairs, desks, roof tiles and other furniture and construction materials.
This translates to less waste being thrown away at dumps.
The tubes made of plastic and aluminum are crushed and mixed with resins at high temperatures to create light and very resistant boards and sheets that can be used in many ways.
Roof tiles are the factory's most popular products. Each one is made from about a thousand small tubes.
[Sebastiao Rufina Barbosa, Factory Owner]:
"There is an interesting ecological feature. If I used wood, I would be taking it from forests and would not replace it. Here I am using what would be considered garbage. The forest is thanking me and, in the same time, we are using an environment friendly material."
The small plant lies in the outskirts of the historic city of Olinda, near the Pernambuco state capital of Recife. Every month, it churns out around 40,000 roof tiles.
[Agnaldo da Costa, Salesman]:
"It's a very good material, very resistant and helps isolate heat. During rainy seasons, other materials let too much noise in while this one doesn't."
The elementary school is also a big fan of the recycled material. Barbosa says school desks made of recycled tubes are easier to clean and last longer than the regular ones made of wood.
[Sebastiao Rufina Barbosa, Factory Owner]:
"I came up with the idea of making chairs because children, for example, wet their pants, spill sodas and schools find it hard to clean them. With this material, they can clean the chairs daily. It is a very resistant material that does not absorb any water. In comparison with plastic laminate and wood, its durability is almost infinite."
School director Maria de Lourdes Negro Monte plans to buy more school desks for all classrooms. She says education officials across the country should follow her example.
[Maria de Lourdes Negro Monte, School Director]
"We think it is very interesting and we need all authorities to see the way we are reusing things that would be thrown away, disposed. This is what we need to do to contribute to save the environment."
Other types of furniture and car bodies are in the owner's future plans.
THE CHEAPEST & EASIEST POP CAN HEATER EVER!! by richallenmusic
http://www.youtube.com/watch?v=XsF9RvVxFc4&feature=related
THE CHEAPEST & EASIEST POP CAN HEATER EVER!! by richallenmusic
HEATER I MADE TO TEST OUT. WITHOUT NO CUTTING CANS OR GLUEING CANS NO DRILLING JUST CANS SITTING IN BOX TEMP GOT UP TO 170 DEGREES IN ABOUT 45 MINS
Sunday, September 11, 2011
How to Build a Solar Bottle Bulb 2.0 ( Updated English Version)
UPDATED, DETAILED INSTRUCTIONS. At long last! I hope this is the latest version... many versions on YouTube.
http://youtu.be/rYTIYUUK70I
Uploaded by MrIllacdiaz on Sep 3, 2011 [Mr Illac Diaz]
Thanks to Marco Bieman from Bieman Production Haus Inc. Video Directing and Editing
63-02-5029766 &
Joy Aquino for Visual Directing. Amazing WORK !
1) Always scratch the sides of the bottle to create better grip to the sealant. The top part where the bottle meets the metal is the leak point in the build so use industrial strength sealant (epoxy or DOW Corning 791) on the top and bottom if possible.
2) Always put a protective cover over the bottle cap as the suns rays tend to make the original bottle cap brittle and a crack in the bottle cap will allow the water in the bottle to leak during evaporation.
3) Always RIVET the metal sheet holder on to the roof.
4) DON't USE THIN METAL ROOFING SHEETS. there will be no bite on the plastic bottle and the different expansion rates will cause leaks later on. Go for thicker roof sheet.
Category:
Nonprofits & Activism
Tags:
Solar
Bulb
More Notes - Solar Bottle Bulb, and The light of life..mp4 video
More notes, and they aren't organized; put in just as I keep finding info. It takes so much to finally get basic info with different ideas. But finally it gets culled down to something that really works. I'm going to pick up materials tomorrow (I leave Thurs. for Guatemala) at hardware and plumbing supply stores to take some different things with me. I'm going to look for a hole cutter drill attachment large enough to make the job go easier. Is there a hand drill for this?
I'm going to go over all this with my architect/engineer when I get back to Lake Atitlan and we'll install some and do some tests. I am just thrilled with the idea, as it's one of the best and easiest recycling projects I've seen yet. That and solar hot water via black plastic tubing or plastic water bottles. Can't wait to get started!
Thank you for re-inspiring me right before I leave for Guatemala and I have just enough days to get some materials together. Keep in touch with whatever else you find, as I'll make up real instructions in English and Spanish and post them as a downloadable pdf on the LakeAtitlanDirectory.com I'm creating and the eco-architecture blog I maintain. Here at Eco-Architecture: http://catherinetoddarchitecture.blogspot.com/
---------
I really like this new video which is one of the best that shows actual installation instructions:
The light of life..mp4: https://www.youtube.com/watch?v=9FiplFylMOc
Since the plastic bottles last up to 300 years (guestimate I've heard) I don't know why people are saying they will last "one, two or five years." Are they thinking of evaporation? Mold? Cap failure? Caulk failure?
As you said, the rain guard/ flange would have to be something really cheap, which is what using the tin roofing square is. I'd like to take it a step further and use a plastic/rubber rain guard and a wire cage to hold the bottle if I can figure out how to make/find them cheap enough. Another recycled goods project?
As far as cutting into wooden houses or roofs in Mexico: The idea of the light bulb bottle is that they don't have to cut large holes in walls, and buy/install windows. Not everyone is skilled to do this. Plus this doesn't work where the rooms are close to each other and don't get direct light. Plus cutting a hole is a lot easier than installing a window. Just about anyone can do it.
I've been looking up Roofing Industry: Rain & Repair Pipe Collars, adjustable rain collars.
I think the ADJUSTABLE MULTI SIZE RAIN COLLAR looks like the best bet so far.
www.ipscorp.com
Features
•
Can be used to repair the elastomer sealing collar on all types of residential "No Caulk" roof vent flashings quickly and easily
•
Eliminates the need for a mastic or caulking type messy repair job
•
Can be used to instantly repair a leak during a wet period, until the flashing can be replaced at a later time
•
Large size covers the entire existing elastomer collar
•
Fully tested for Ultraviolet, Ozone, and Weather Resistance
•
Individual Sizes and Multi Size adjustable models available
•
Better appearance than a mastic repair job, which means a more satisfied customer
Don't see the product you need? Call Customer Service at 800-888-8312.
Pipe Collar in use
Download Product Literature
ADJUSTABLE MULTI SIZE RAIN COLLARS
http://www.ipscorp.com/watertite/roofingproducts/raincollars/rainrepair
"Can be used to repair the elastomer sealing collar on all types of residential "No Caulk" roof vent flashings quickly and easily... "
and Adujstable Roof Flanges, Roof Vent Pipe Flashing, Plumbing Vent Pipe Flange/Flashing,
I also found that gray caulk you see in the video. It's called Vulcaseal. Another facebook entry said:
See: use silicon sealant instead of Vulcaseal (which is only in the Philippines… the brand has evolved to become a common household item, used to seal cracks & gaps in roofing, plumbing/pipes, gutters, downspouts, sinks & P-traps. … SUPER VULCASEAL is a one-component sealant for use on and between all common household, automotive and construction materials.)
Vulcaseal: http://www.bostik.com.ph/%28S%28hwftcm55rzutg0rnhiamfk55%29%29/products_hardwarelist_view.aspx?newsID=87&AspxAutoDetectCookieSupport=1
-------
Nojj Jatt wrote on FB: I'm also building a solar bulb, just like the one you posted in your account, but my design consist of two mineral bottles instead of one, and i use a silicon sealant instead of vulcaseal. My project is still progressive, maybe i can upload it on youtube by sometime this week. Skeptic kas talagai ako kung maliwanag ba talaga, but i am positively hopeful that it is. :)
https://www.facebook.com/pages/A-Liter-of-Light-Isang-Litrong-Liwanag/181127878593329
Another way to get light into a house:
I lived in a beautiful wooden casita when I first went to Guatemala that an American had built out of an old shed. It had a plexiglass strip all around 3 sides of the house up under the ceiling/roof line. It let in so much light all the time I would think I had left the lights on when I would be leaving, and I'd keep flipping the switch! Everyone that visited thought the same thing, and the Guatemalans couldn't believe how much light the house had. I wonder if we could do something like that with plastic bottles.
I've seen the bottle bulb listed as good for one year or five years. I've seen so many discrepancies about the simple materials used but NOTHING about the most important thing, THE SEALING CAULK.
And you're right: any kind of flange
On Sun, Sep 11, 2011 at 11:30 AM, Melody wrote:
Yep, just an educated guess, but you’re right, it would be nice to have some more practical information. I would say that the bottle will hold up, though, I doubt that it would start to leak. They have a half-life of about 1000 years, right?
Whatever the flange is, it would have to be easily and cheaply home-made. Otherwise the purpose of this almost-free light source is nullified.
Lots to think about! I’ve contacted a friend here who is Mexican-American and very active in the community to ask if this could be a helpful thing in out environs. Because they are plywood homes, people can cut windows easily, so light might not be a problem here.
Keep in touch. Be well.
Melody
From: Catherine Todd [mailto:catherinetodd2@gmail.com]
Sent: Saturday, September 10, 2011 11:34 PM
To: Melody Scott
Subject: Re: water bottle lights
Thanks for writing back, Melody! I'm so glad I put my email on the video.
I have read a number of concerns over the caps failing due to UV rays, as a different type of plastic is used as is used for the clear bottle. I will try to find more information about this. Small scale or large scale, I wouldn't want the bottle to fail and water and bleach get splashed all over the house!
Just because "most videos" show something one way, it doesn't mean it's the correct way. Especially when it's just the same repeated information, over and over.
This is often what happens with alternative ideas. They get executed poorly and are sloughed off, so this solar bottle bulb is such a great idea I hope we can do it right.
Why would the water and bleach solution need to be changed after one or two years? Did you read this somewhere or is it an educated guess? I have wondered about this "estimate" and again, no real information is given. I don't know why the "million light bulbs" guy in the video hasn't posted instructions on his website. So many people are interested... I know I'll post them for free when I have a real working model.
The fact that you are using plywood roofs might make it even better, since you might have to use some kind of cage that the bottle sits in, with a flange that fits over the roof opening, like a stove pipe that goes through the roof. Some of the rooms I'm going to be installing the lights in have concrete roofs (the entire building is concrete) so I'm thinking along those lines myself.
Let's definitely keep in touch. I posted our email with my questions on my eco-architecture blog, without your email address. If you want me to take your part out, I will. But it's so important I wanted to keep all the info together for the time being.
http://catherinetoddarchitecture.blogspot.com/
Thanks again for writing. You have re-inspired me to test out this product and I'll go to Lowe's and get some parts before I leave next week for Guatemala!
Catherine Todd
On Sun, Sep 11, 2011 at 12:52 AM, Melody wrote:
Hi, Catherine,
You put your email on one of the YouTube videos. I understand your concerns, and if you’re going to try it large-scale then I see why you want answers first. But maybe the answer is to try it small-scale and work out the details that way.
In my case, the buildings here are made of plywood mostly, so I’d have to talk to some builder friends and discover the best way to attach the bottle. Only one person in all the videos I saw mentioned the film canister. I don’t think that’s a concern, most videos just show a bottle with a regular cap:
http://www.youtube.com/watch?v=ziT3XYE2xSA&feature=share
As for replacing it, my understanding is that you would only have to replace the water and bleach. Even if the person would need to replace the entire bottle, it should be a matter of climbing on the roof and pulling it out and replacing it. Like you, I think the method of cutting the roofing material with tin snips to create a flange is the best way to do it.
Anyway, let’s keep in touch, and I hope you feel better soon! Melody
From: Catherine Todd [mailto:catherinetodd2@gmail.com]
Sent: Saturday, September 10, 2011 7:30 PM
To: Melody Scott
Subject: Re: water bottle lights
Dear Melody,
Where did you find my email, and thank you for the link!
I had pieced together instructions from all over the web, but these are a nice list with two good videos. But I see some discrepancies and some questions that still remain. I'm sick right now on medication, so I'm not very well organized below, but here are my thoughts. Let me know what you find out.
This idea is so great that I will pay someone to draw up real instructions in Spanish and English if we can get a real, working model. Then we need to start doing real tests.
I'm finding a few problems with the simplistic instructions found on the web.
I'm going to see what my architect & engineer in Guatemala thinks about this when I get back next week.
1. Bottle cap may fail due to UV rays. Instructions say "use film dispenser cap" to protect the cap. No one has "film dispenser caps" anymore since we are all digital.
2. I've seen instructions for coating the bottle cap with caulk to protect it from the sun's rays, or people have just capped it with a regular bottle cap, as shown in the video. Who knows what might happen?
3. I also wonder about: "The solar bulb is expected to last up to two years before it needs changing."
What part(s) will need changing - i.e. fail - within two years? I'll do a test and start the process.
4. I've seen the square piece of tin roofing material caulked on the underside and then riveted down on all four corners, with the edges of the plate, all rivets and the plastic bottle cap covered with caulk. Or just caulked on the edges. Seems like rivets are a better way to go.
5. I've seen "clean water" and "purified water" instructed to be used, and "don't use tap water or mold will grow". Since you add bleach, I'm not sure what if any the difference is.
I spoke to an engineer in the states about this solar bottle bulb idea and he pointed out something important:
6. It is only the caulk that keeps the bottle in place.
He felt that there was a good possibility the caulk could fail within one to two years, and "probably during the rainy season." He cautioned me against cutting holes in people's roofs without "seeing how this plays out first."
7. Perhaps we can add a cage of some kind to hold the bottle so it wouldn't depend solely on caulk for keeping it in place.
8. I'm also going to bring some of the best outdoor caulk I can find when I return to Guatemala. There's no guarantee that high-quality caulk will be available when I get there, or at what location or price.
9. Hole in plate: Check the video on my website that shows the actual construction of the metal plate, that has small tabs cut on the inside of the circle and are bent into place.
http://catherinetoddarchitecture.blogspot.com/
That is better than the simple instructions below that say
"Step 2. Make a hole in the 1’x1’ roof sheet material, just the same size of the bottle’s circumference..."
10. On the link you found and on my eco-blog there is a video of an engineer from Brazil who installed these solar water bottle bulbs in his workshop three years ago, and started this idea. He used film dispensers over his bottle caps. I don't know how they've held up. I am going to try and contact him if I can find any kind of contact information.
11. Water:
Step 1. Fill the 1.5 liter clear soda bottle with purified water then add 3 tablespoons of liquid bleach and tightly seal the cap. Do not use tap water because this will allow the growth of moss.
I don't think it matters what kind of water is used, as long as it's clean, if it has bleach in it which will prevent moss. If you are using "purified water" then you aren't recycling used bottles, as you might as well just buy the liters or refill them from a larger container.
11.b. Cap: I also don't know what "tightly seal the cap" means. If you don't caulk it, I wonder how much will dissipate? Seems like a lot.
12. Bleach: I think the Brazilian engineer used two capfuls of bleach but I've also read using 1 capful. Your link says "three tablespoons." It should be just enough bleach to keep mold from growing in the water. I don't know how much that really is, so this will need to be tested.
13. Indoor Tubing:
A scientist friend of mine has suggested running two pieces of plastic tubing from the bottle down the inside of a wall and putting a reflector behind it. He said leave the tubing movable "for close work" and the reflector would really help brighten the house. So I think there has got to be something to this.
My architecture blog with everything I could find about the solar bottle bulb:
http://catherinetoddarchitecture.blogspot.com/
Here's the instructions from the link you found below.
Thanks for writing and please let's keep in touch! I'm really excited about this project and want to do it right. CT
http://www.pinoybisnes.com/business-ideas/how-to-make-solar-bottle-light-bulb/#ixzz1XbUkcX84
How to make your own Solar Bottle Light Bulb?
The materials are the following: 1.5 liter soda bottle, 1’x1’ roof sheet material, purified water, camera film dispenser, chlorine and a rubber sealant.
Procedure:
Step 1. Fill the 1.5 liter clear soda bottle with purified water then add 3 tablespoons of liquid bleach and tightly seal the cap. Do not use tap water because this will allow the growth of moss.
Step 2. Make a hole in the 1’x1’ roof sheet material, just the same size of the bottle’s circumference and insert the bottom part of the bottle leaving it exposed under the sunlight.
Step 3. Next, make another hole on the roof of the house (same as the bottle’s circumference) where you want to put the solar bulb and firmly fix the device.
Step 4. Seal the roof with a sealant to prevent raindrops from getting inside the house. It will produce a light when the water inside the bottle bulb refracts and scatters the light inside the house.
The solar bulb is expected to last up to two years before it needs changing.
See two videos on the website, includes "Solar Bottle Bulb from GMAnews.tv"
http://www.pinoybisnes.com/business-ideas/how-to-make-solar-bottle-light-bulb/#ixzz1XbUkcX84
The Brazilian video is also on YouTube:
http://www.youtube.com/watch?feature=player_embedded&v=_zMAWztZ6TI
Related Search Terms: solar bottle light, solar bottle, solar bottle bulb materials, Solar bottle bulbs, solar bottle light bulb, solar light bulb, bottle bulb, solar bottle bulb procedure
Recommended Readings
Instead of kerosene, a solar-powered light bulb
Customisable window collects solar energy
Buy a bottle of wine and donate clean water
Water-bottle refills at cafés, now with a charitable twist
How to Make Solar Cell
From Japan, gardening in reused bottle caps
Connecting owners and renters of solar-friendly rooftops
New water purity sensor offers a breakthrough for solar disinfection
Solar smartphone comes with eco bragging rights
Dutch solar cycle path generates electricity
Solar-powered pest control
How to Make Inexpensive Laundry Detergent
Read more: http://www.pinoybisnes.com/business-ideas/how-to-make-solar-bottle-light-bulb/#ixzz1XbXFInaz
On Sat, Sep 10, 2011 at 6:51 PM, Melody wrote:
Actually I found them! Here.
http://www.pinoybisnes.com/business-ideas/how-to-make-solar-bottle-light-bulb/
Melody
From: Melody
Sent: Saturday, September 10, 2011 3:46 PM
To: 'catherinetodd2@gmail.com'
Subject: water bottle lights
Hi, I wondered if you ever got the written instructions to make those lights from water bottles? I’d like to introduce it in the area in Mexico where I live, too.
Thanks,
Melody
--
Catherine Todd
3007 Bent Tree Dr. Oxford NC 27565
H 919.693.0853 U.S. cell 919.605.0727
CatherineTodd2@gmail.com or CTodd1000@gmail.com
Blog: http://catherinetodd.blogspot.com/
Music: http://www.last.fm/music/Catherine+Todd
Photos: http://www.flickr.com/photos/catherinetodd/sets/
AtitlanArts.com, Guatemalan Arts & Crafts (GAC)
Panajachel, Lake Atitlan
Guatemala cell (dial 011 from the U.S.):
(502) 5013.6300
Directory: LakeAtitlanDirectory.com/
Travel: http://lakeatitlan.blogspot.com/
Eco-Architecture: http://catherinetoddarchitecture.blogspot.com/
For 2011:
"The winds of grace blow all the time. All we need do is set our sails."
~ Sri Ramakrishna Paramahamsa ~ Gospel of Ramakrishna
All sorrows can be borne if you tell a story about them.
~ Karen Blixen
Peace and justice are goals for man.
~ Mahatma Gandhi
-------
More comments with great ideas:
1. @CommentsSurvey Good questions, im guessing Glass Bottles would work just as well, and there is some very good quality silicone out these days, rated to last years , it would be quite easy to change the water /chlorine if needed, hop on the roof, unscrew the cap suck it out with something and refill it., yeah great idea, i need some in my dark (no sun) room
MrWompycat 8 hours ago
2. @CommentsSurvey easy to improve on design if lucky enough to have access to 'better' tools, pre fab parts, top notch silicone etc, there is already so many pre fab parts for plumbing, sky lights, wood stove flanges, massive 'worm clips, hose clamps' to fix solidly and professionally into a roof.. and use glass bottles if available.
MrWompycat 7 hours ago
3. @CommentsSurvey Yes it is a fantastic idea. I like the idea of the cage but I think they are limited in resources. Since the bottles have those nubs on the bottom of them, it may be easy to use 2 pieces of wire to create a simple holder and attach it to 4 small holes in the steel panel at the top. You would cut 2 pieces of wire twice as lon as the bottle; make a cross out of the wire joining them in the middle and twisting just once;
MsSuke13 14 minutes ago
4.
y CONTINUED: then place the middle cross section of the wire in the centre of the bottom of the bottle and bend them up around the bottle using the nubs as notches to hold them in place. Hook the ends through holes in the tin panel and secure. Also caulk the holes so no rain gets in.
I also wonder if salt would work instead of chlorine to stop mold etc?? Unless salt is more expensive. I don't like the idea of the chlorine going into the environment at the end. LOL
MsSuke13 11 minutes ago
Response:
1. Glass bottles with metal cap. Cap would not deteriorate, but use caulk to prevent evaporation? Industrial strength silicone:
2. Tools: what tools? I am going to bring whatever tools and materials I need to Guatemala. Parts: I’ve been looking at all kinds of plumbing pipe, roof and rain guards made in the USA. They are expensive here but maybe we could copy the idea. Industrial strength silicone.
Why use glass bottles? Part of the idea is that the plastic bottles are recycled and trashed right now.
What are 'worm clips, hose clamps' to attach into roof? How is this different than the Vulca…. Used in the Philippines?
3. HOLDER: “…Since the bottles have nubs on the bottom of them, use 2 pieces of wire to create a simple holder and attach it to 4 small holes in the steel panel at the top. Cut 2 pieces of wire twice as long as the bottle; make a cross out of the wire joining them in the middle and twisting just once; then place the middle cross section of the wire in the centre of the bottom of the bottle and bend them up around the bottle using the nubs as notches to hold them in place. Hook the ends through holes in the tin panel and secure. Caulk the holes so no rain gets in.
3b. Would salt would work instead of chlorine to stop mold etc?? Unless salt is more expensive. I don't like the idea of the chlorine going into the environment at the end.
That’s an EXCELLENT idea. And chlorine is no laughing matter. I’m going to try both and see what happens. Anyone have an answer?
Lights Made With Bottles & Water

Lights Made With Bottles & Water
By Megan Ly, eHow Contributor
http://www.ehow.com/info_10045326_lights-made-bottles-water.html
updated August 08, 2011
Lights Made With Bottles & Water: Reusing 2-L bottles as solar bulbs is good for the environment in two ways: it cuts down on solid waste and electricity usage.
Solar bottle bulbs are lights made out of 2-L bottles that use no electricity and produce the same amount of light as a 50- to 60-watt incandescent bulb. These lights are used in developing countries where energy prices are high and median incomes are low. Nearly anyone can make these lights and install them in a workshop or other area where a hole can be cut in the ceiling to allow direct sunlight.
How They Are Made
Solar bottle bulbs are simple to construct. A 2-L bottle is filled with water and roughly two capfuls of bleach. A hole is cut in a square piece of corrugated metal and is placed around the bottle to prevent leakage through the roof and to help secure the bottle in place. A hole the same diameter as the bottle is then cut in the roof of the structure, and the bottle is inserted into the hole. The bottle cap is either covered in a protective substance or a plastic covering to protect it from sun damage.
How They Work
The lights work by refracting sunlight in a 360-degree arc around the room, which provides superior light to a window or skylight, only allowing light into a room in a direct beam. The bleach keeps the water clean and clear by preventing algae growth. The bottle lights should last around five years if left undisturbed.
Brazil
In 2002, Alfredo Moser, an engineer in Brazil, got the idea to use solar bottle bulbs in his workshop so that he could continue to work during the energy shortage. His neighbors, intrigued by the idea, soon started following suit, adding the bulbs to their homes in kitchens, bathrooms and living areas where electric light was prohibitively expensive and inefficient.
A Liter of Light
The MyShelter Foundation runs a program in the Philippines called Isang Litrong Liwanag: a Liter of Light. Based on a project developed by students at MIT under the Appropriate Technologies discipline, the project aims to bring sustainable, affordable lighting to the underprivileged rural communities in the country.
Read more: Lights Made With Bottles & Water | eHow.com http://www.ehow.com/info_10045326_lights-made-bottles-water.html#ixzz1XdQDNiId
A Liter of Light (Isang Litrong Liwanag): on Facebook: https://www.facebook.com/pages/A-Liter-of-Light-Isang-Litrong-Liwanag/181127878593329
References
Isang Litrong Liwanag: Home Page: http://isanglitrongliwanag.org/
Clean Technica; Solar Lights Made of Plastic Bottles & Water; Zachary Shahan; August 2011:
http://cleantechnica.com/2011/08/01/solar-lights-made-of-plastic-bottles-water/
Make; Lights Made from Water Bottles; Gareth Branwyn; April 2009
Read more: Lights Made With Bottles & Water | eHow.com http://www.ehow.com/info_10045326_lights-made-bottles-water.html#ixzz1XdSG5TGb
---
What Can Be Made Out of Recycled Water Bottles?
What Items Can Be Made From Plastic Water Bottles?
How to Get Water Bottles Made for Our School
Types of Plastic Water Bottles
How to Hang Lights Made from Wine Bottles
135 Years of Electrical Engineering Discover the Latest Innovations.
www.siemens.com/energy/services
Enterawater - reusable
Saturday, September 10, 2011
Email re: Solar Water Bottle Bulb
solar light bulbThe light of life..mp4
http://youtu.be/ziT3XYE2xSA
Email rec'd 10 Sept. 2011 and my response:
Catherine Todd
Sat, Sep 10, 2011 at 10:30 PM
Dear Melody,
Thank you for the link with videos and instructions (pasted below)!
I had pieced together instructions from all over the web, but these are a nice list with two good videos. But I see some discrepancies and some questions that still remain. I'm sick right now on medication, so I'm not very well organized below, but here are my thoughts. Let me know what you find out.
This idea is so great that I will pay someone to draw up real instructions in Spanish and English if we can get a real, working model. Then we need to start doing real tests.
I'm finding a few problems with the simplistic instructions found on the web.
I'm going to see what my architect & engineer in Guatemala thinks about this when I get back next week.
1. Bottle cap may fail due to UV rays. Instructions say "use film dispenser cap" to protect the cap. No one has "film dispenser caps" anymore since we are all digital.
2. I've seen instructions for coating the bottle cap with caulk to protect it from the sun's rays, or people have just capped it with a regular bottle cap, as shown in the video. Who knows what might happen?
3. I also wonder about: "The solar bulb is expected to last up to two years before it needs changing."
What part(s) will need changing - i.e. fail - within two years? I'll do a test and start the process.
4. I've seen the square piece of tin roofing material caulked on the underside and then riveted down on all four corners, with the edges of the plate, all rivets and the plastic bottle cap covered with caulk. Or just caulked on the edges. Seems like rivets are a better way to go.
5. I've seen "clean water" and "purified water" instructed to be used, and "don't use tap water or mold will grow". Since you add bleach, I'm not sure what if any the difference is.
I spoke to an engineer in the states about this solar bottle bulb idea and he pointed out something important:
6. It is only the caulk that keeps the bottle in place.
He felt that there was a good possibility the caulk could fail within one to two years, and "probably during the rainy season." He cautioned me against cutting holes in people's roofs without "seeing how this plays out first."
7. Perhaps we can add a cage of some kind to hold the bottle so it wouldn't depend solely on caulk for keeping it in place.
8. I'm also going to bring some of the best outdoor caulk I can find when I return to Guatemala. There's no guarantee that high-quality caulk will be available when I get there, or at what location or price.
9. Hole in plate: Check the video on my website that shows the actual construction of the metal plate, that has small tabs cut on the inside of the circle and are bent into place.
http://catherinetoddarchitecture.blogspot.com/
That is better than the simple instructions below that say
"Step 2. Make a hole in the 1’x1’ roof sheet material, just the same size of the bottle’s circumference..."
10. On the link you found and on my eco-blog there is a video of an engineer from Brazil who installed these solar water bottle bulbs in his workshop three years ago, and started this idea. He used film dispensers over his bottle caps. I don't know how they've held up. I am going to try and contact him if I can find any kind of contact information.
11. Water:
Step 1. Fill the 1.5 liter clear soda bottle with purified water then add 3 tablespoons of liquid bleach and tightly seal the cap. Do not use tap water because this will allow the growth of moss.
I don't think it matters what kind of water is used, as long as it's clean, if it has bleach in it which will prevent moss. If you are using "purified water" then you aren't recycling used bottles, as you might as well just buy the liters or refill them from a larger container.
11.b. Cap: I also don't know what "tightly seal the cap" means. If you don't caulk it, I wonder how much will dissipate? Seems like a lot.
12. Bleach: I think the Brazilian engineer used two capfuls of bleach but I've also read using 1 capful. Your link says "three tablespoons." It should be just enough bleach to keep mold from growing in the water. I don't know how much that really is, so this will need to be tested.
13. Indoor Tubing:
A scientist friend of mine has suggested running two pieces of plastic tubing from the bottle down the inside of a wall and putting a reflector behind it. He said leave the tubing movable "for close work" and the reflector would really help brighten the house. So I think there has got to be something to this.
My architecture blog with everything I could find about the solar bottle bulb:
http://catherinetoddarchitecture.blogspot.com/
Here's the instructions from the link you found below.
Thanks for writing and please let's keep in touch! I'm really excited about this project and want to do it right. CT
http://www.pinoybisnes.com/business-ideas/how-to-make-solar-bottle-light-bulb/#ixzz1XbUkcX84
How to make your own Solar Bottle Light Bulb?
The materials are the following: 1.5 liter soda bottle, 1’x1’ roof sheet material, purified water, camera film dispenser, chlorine and a rubber sealant.
Procedure:
Step 1. Fill the 1.5 liter clear soda bottle with purified water then add 3 tablespoons of liquid bleach and tightly seal the cap. Do not use tap water because this will allow the growth of moss.
Step 2. Make a hole in the 1’x1’ roof sheet material, just the same size of the bottle’s circumference and insert the bottom part of the bottle leaving it exposed under the sunlight.
Step 3. Next, make another hole on the roof of the house (same as the bottle’s circumference) where you want to put the solar bulb and firmly fix the device.
Step 4. Seal the roof with a sealant to prevent raindrops from getting inside the house. It will produce a light when the water inside the bottle bulb refracts and scatters the light inside the house.
The solar bulb is expected to last up to two years before it needs changing.
See two videos on the website, includes "Solar Bottle Bulb from GMAnews.tv"
http://www.pinoybisnes.com/business-ideas/how-to-make-solar-bottle-light-bulb/#ixzz1XbUkcX84
The Brazilian video is also on YouTube:
http://www.youtube.com/watch?feature=player_embedded&v=_zMAWztZ6TI
Related Search Terms: solar bottle light, solar bottle, solar bottle bulb materials, Solar bottle bulbs, solar bottle light bulb, solar light bulb, bottle bulb, solar bottle bulb procedure
Recommended Readings
Instead of kerosene, a solar-powered light bulb
Customisable window collects solar energy
Buy a bottle of wine and donate clean water
Water-bottle refills at cafés, now with a charitable twist
How to Make Solar Cell
From Japan, gardening in reused bottle caps
Connecting owners and renters of solar-friendly rooftops
New water purity sensor offers a breakthrough for solar disinfection
Solar smartphone comes with eco bragging rights
Dutch solar cycle path generates electricity
Solar-powered pest control
How to Make Inexpensive Laundry Detergent
Read more: http://www.pinoybisnes.com/business-ideas/how-to-make-solar-bottle-light-bulb/#ixzz1XbXFInaz
Subscribe to:
Posts (Atom)